Do you want to add beautiful Custom Fonts in your WordPress website? If yes, here you are in the right place. In this article, we will learn to add custom fonts in our WordPress website. I have mentioned the steps for users using free as well as premium themes. Let’s start:
What are Custom Fonts?
Custom Font is an effective tool for the branding and web designing of your website. It enables your niche and audience to see the topics you cover in a vibrant way which might be preferred by them.
The best part is that fonts can be customized freely like the colour, images, headings and text size of your WordPress website.
Many companies often end up using the same font time and again. In this case, if you learn to add custom fonts in WordPress, you will be able to style your website’s font size, font slant, font thickness and much more as per your requirement.
Why are Custom Fonts Necessary?
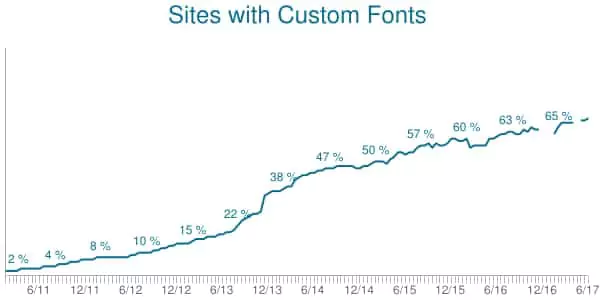
Many WordPress Beginners might not know this but fonts play an important role in the way your web page renders. According to Akamai Developer, the use of custom fonts has increased rapidly in a decade. 68% of websites in the HTTP Archive use at least one custom font.
Using Custom Fonts you can come up with really creative ways to use text. Custom Fonts can be designed around logos and existing images as well. Anything that you think of can be turned into text just the way you want it to be.
As you know the importance of custom fonts, I am sure you want to add it to your website as well. Let’s begin the way step wise step:
Add Custom Fonts in WordPress
A WordPress user can have either free or premium WordPress themes in their website. The use of free themes might have limited options of Custom Fonts whereas in most of the premium WordPress themes, the option of Custom Fonts are added by default.
In this article we will view the ways to add Custom Font for free as well as premium themes. Let’s start:
Add Custom Fonts in Free WordPress Theme
The easiest way to add custom fonts in WordPress is by using a WordPress plugin. While following this method, users don’t need to use coding which makes it even easier.
Install Easy Google Fonts Plugin
First of all, you need to Install and Activate the Easy Google Fonts plugin by Titanium Themes.
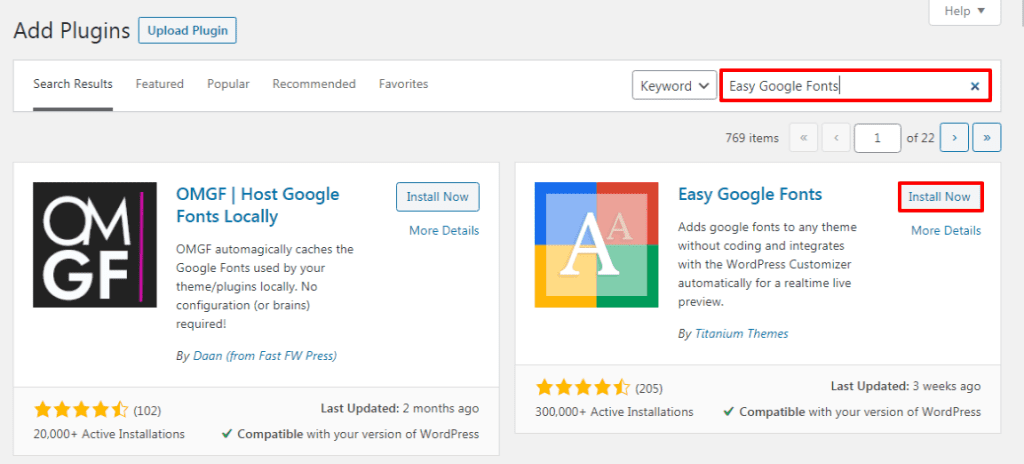
You can also use other plugins but be sure that it meets your website requirements.
If you don’t have knowledge regarding installing a plugin go through our article “How to Install a Plugin on your WordPress website”
Customize the Plugin
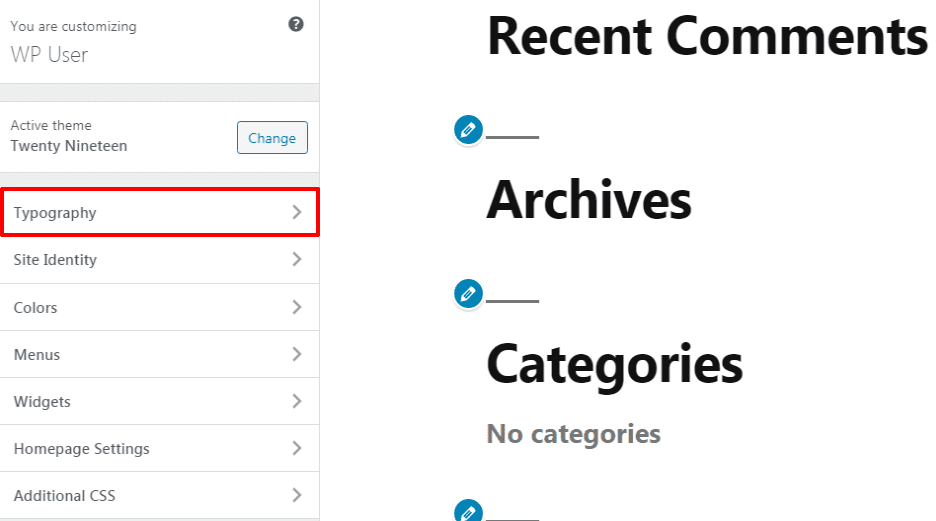
After activating the plugin, go to Appearance>>Customize page at the left sidebar of the page. Over there you can see the Typography section, click on that section.
You need to click on the Edit Font option below any option that you want to edit. Under the Font Family section, you can choose the Standard Web Fonts as per your requirement.
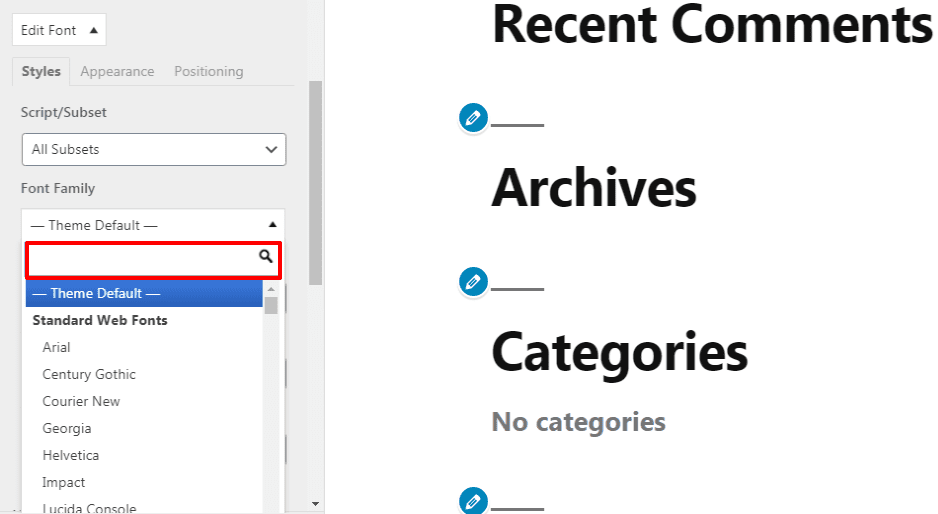
Then make changes in Font Weight/Style, Text Decoration and Text Transform as per your requirement.
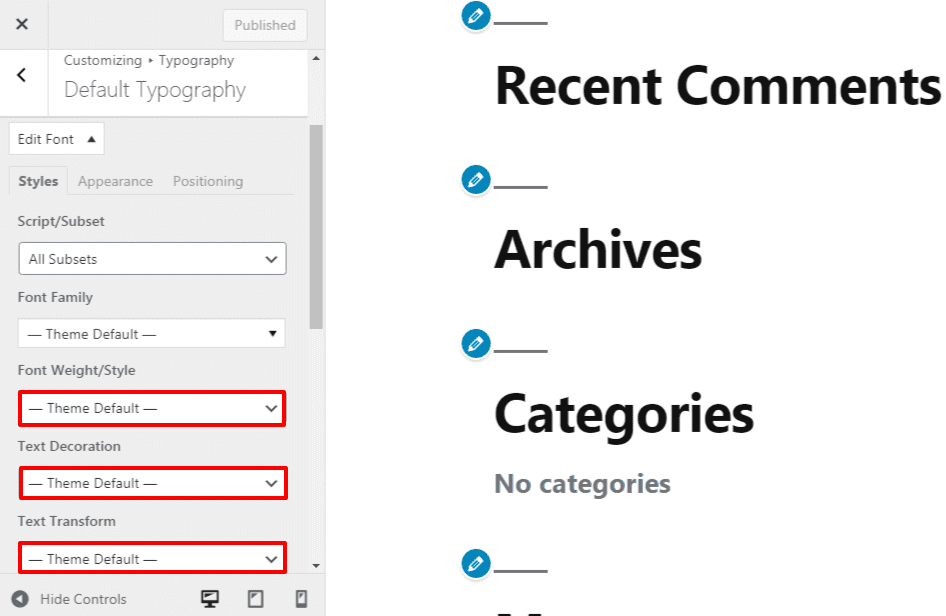
The sections available might be limited due to the theme that you are using on your website. So, this plugin enables you to create, control and change fonts on the website.
In order to do it, go to Settings>>Google Fonts page. Then fill up the appropriate name in the Control name.

Now, click on Create Font Control option at the right side of the page. Then the plugin asks you to Add CSS selectors. After that add HTML elements or use CSS classes.
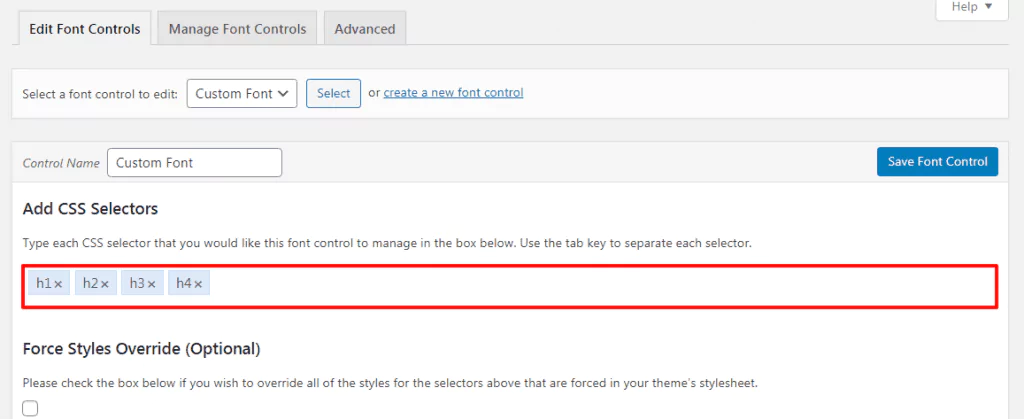
Click on Save Font Control to save all the changes you have made on your website.
Note: You can create the numbers of font controllers as per your requirement.
In order to use these font controllers go to Appearance>>Customizer option at the left sidebar of your page.
Apply Font Controllers
Then click on Typography>>Theme Typography option.
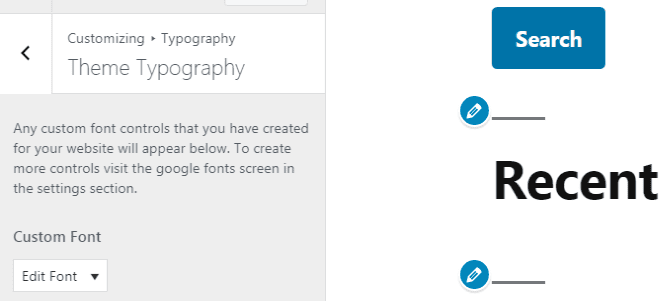
Finally, click on the Publish button to save all the changes that you have made on your website.
Add Custom Fonts in Premium WordPress Themes
If you’re using any of our Premium WordPress Theme (Oshine, Exponent and Spyro), then you’ll have a responsive Custom Font Plugin – Typehub in your website by default.
Typehub comes bundled with the theme files, users can’t separately download it. You need to purchase the theme to use it.
Note: Typehub is not our product. The plugin is used to help users add custom fonts and other similar features on their website.
The plugin is used in your website to provide you full control over the typography of various elements across the website. Using the plugin, you can easily screen it on your WordPress dashboard and modify the Font settings.
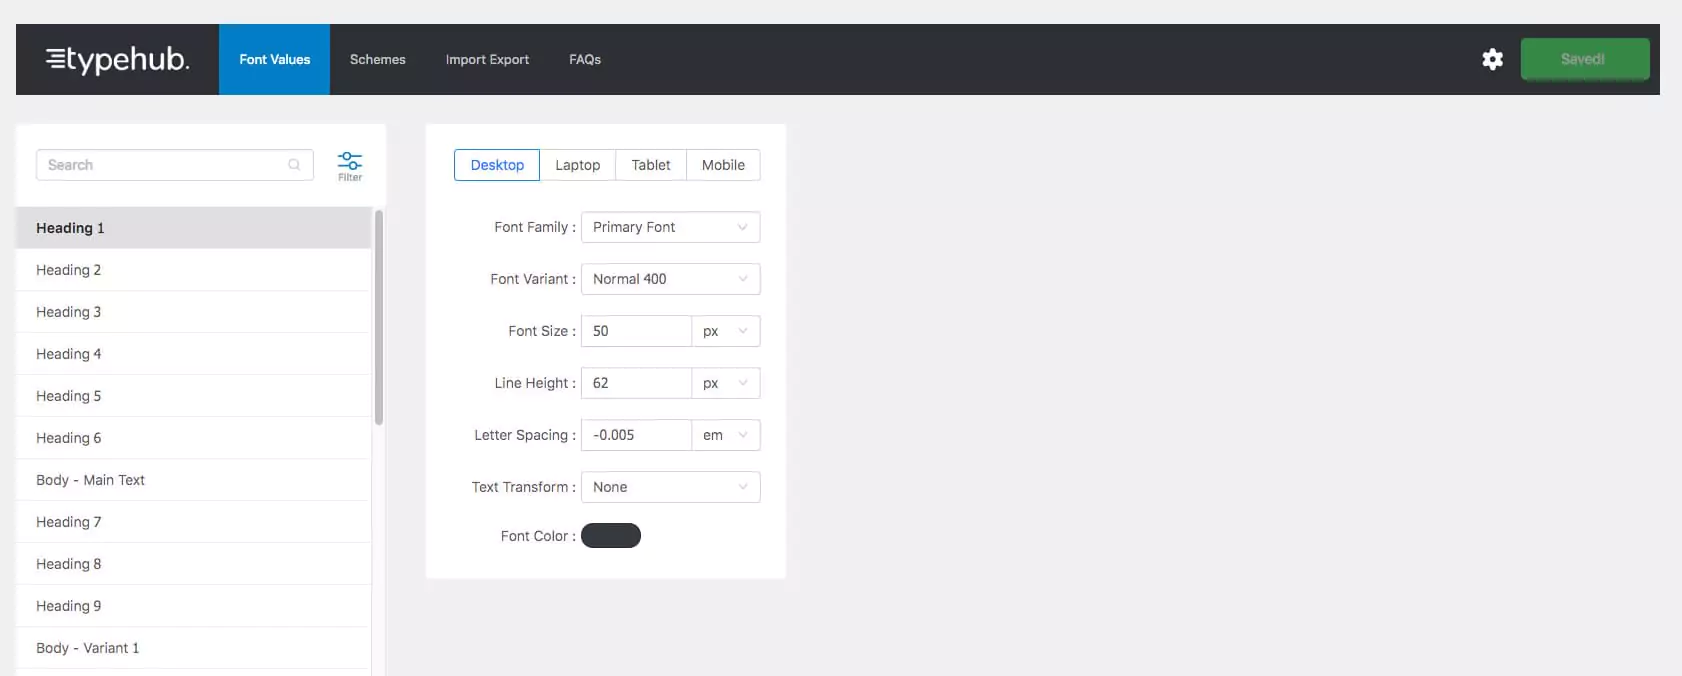
Adding Font Values
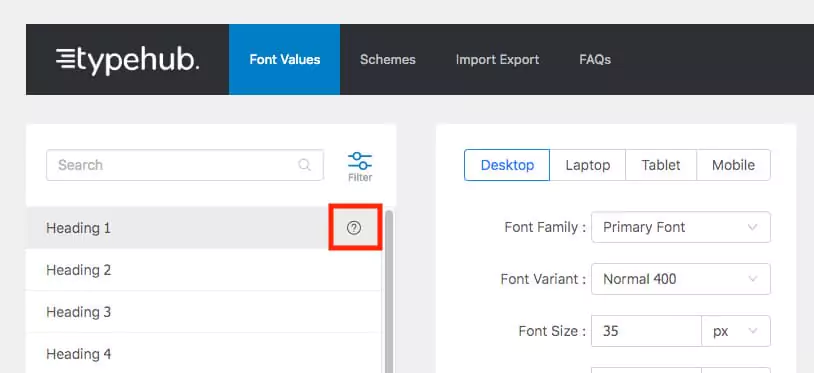
In this tab, you can change the font values of different elements in the site.
Click on the “?” icon beside the Label in the “Font Values” screen to view a preview of the corresponding setting.
Adjusting Font Schemes
A font scheme is just an alias for a font family. You can assign to a group of fields that may use the same font.
For example: If all the headings in your website use the same font family, just save the font as a scheme and assign the scheme as the font family value for the individual fields.
If you want to change the font of all the headings at a later point in time, you don’t have to edit each field individually. All you have to do is to edit the font scheme.
Responsive Breakpoints:
Desktops – Screen size > 1377px.
Laptops – Screen size between 1024px – 1377px
Tablets – Screen size 768px – 1024px
Mobile – Screen size < 768px.
Multi Select and Edit
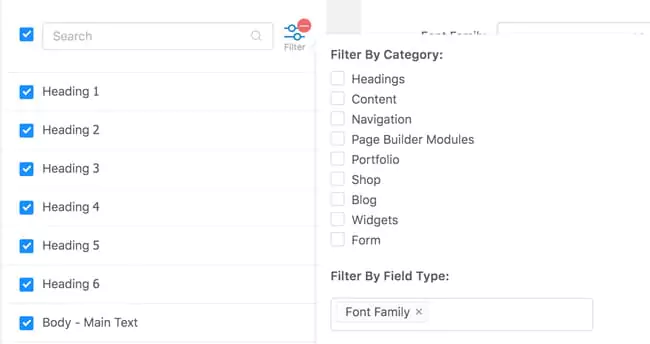
You can multi select and edit fields as long as they have the same properties. So, you have to filter the items based on field types.
For Example: Filter by font-family and subsequently you will be able to select and edit all the fields that have this property and make changes in the bulk.
Uploading a Custom Font
In Typehub 2.0, we have added provision in the plugin to upload custom fonts. Follow the simple steps below to generate and upload your custom fonts.
- Go to Web Font Generater
- Upload your font’s source OTF / TTF file ( DO NOT check the Embed font data in CSS option )
- Generate web font and download the package
- Go to the Custom Fonts tab inside Type Hub and upload the web font package.
- That’s it, you can now use your custom font for any of the font options.
Adding a custom Font programmatically using APIs
To add a custom font, simply register the font using the “typehub_register_font” hook. A sample code that you can add to the functions.php file of your child theme, is shown below.
add_action( ‘typehub_register_font’, ‘my_typehub_custom_font’ );
function my_typehub_custom_font() {
$font = array(
‘name’ => ‘CUSTOM FONT NAME’,
‘src’ => get_stylesheet_directory_uri().’/fonts/fonts.css’, // URL of your font’s stylesheet. Assuming its inside the fonts folder of your child or main theme
‘variants’ => array(
‘300’ => ‘Light’,
‘400’ => ‘Normal’,
‘500’ => ‘Medium’,
‘700’ => ‘Heavy’
)
);
typehub_register_font( $font );
}
Wrapping Up
This is the end of our tutorial guide on ‘How to Add Custom Fonts in WordPress Website?’ Adding custom fonts on your site has no fixed way. One can make use of various plugins or codes available on the web to apply changes. However, the use of the best plugin and right technique can help you get the best of your website.

